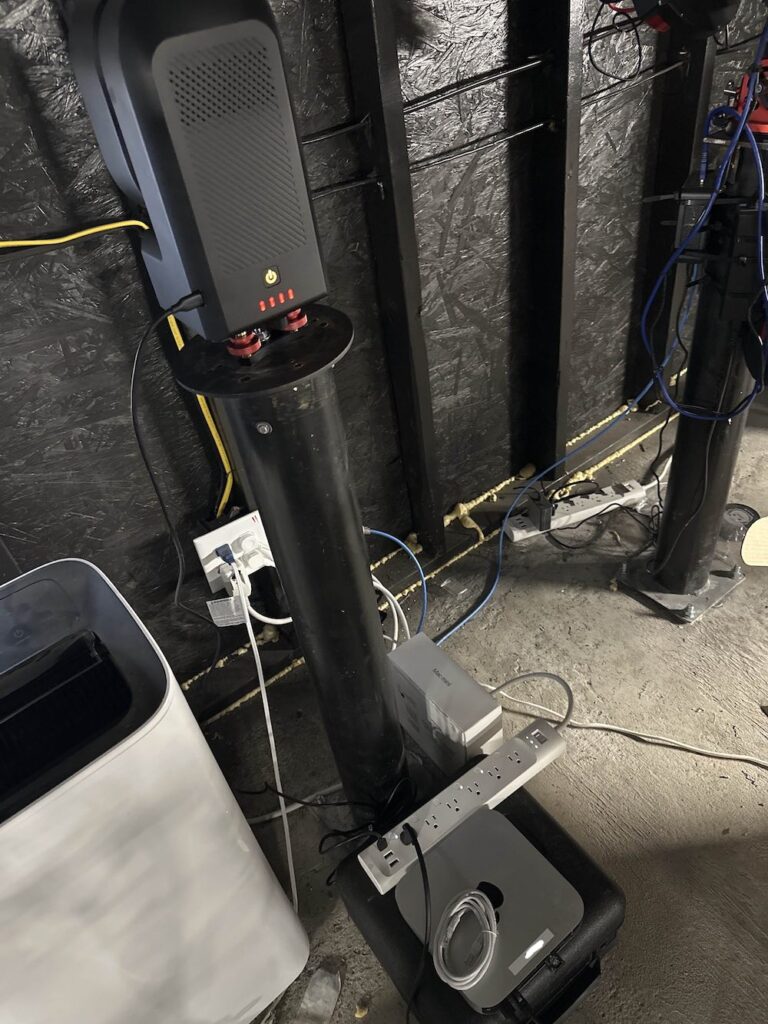
I’m excited about my new project where I’m using a second Seestar S50 at a bortle 2 remote observatory Texas.
Here is how I did it.
Equipment: Seestar S50, Apple MacMini M2(must be a newer model using the M series chips), leveler, KASA ip power strip.
I’ve been thinking about how to get this done for over 2 months. Initially, I thought that I could use an iPad or Android tablet as a host, but realized that very few if not all tables do not allow it to be controlled remotely. There are a few apps that claim you can do this, but don’t waste your time. It won’t work reliably. Then I connected my Seestar to my wife’s M1 MacBook Air and realized that was the way to go! The key is that it must be a newer Mac running the M series chipset which runs IOS iPhone and iPad apps.
Then using Google Remote Desktop I can easily access and control the Seestar from anywhere in the world. Even from my iPhone!
Someone will have to set up the Seestar and run through the initial blue tooth connection to the Mac at the remote site. Once the MacMini and Seestar are connected via the Seestar’s internal blue tooth wifi, goto the wifi settings on the Seestar and put it in Station Mode. With Station Mode, both the MacMini and Seestar connect via the same wifi at the remote site. Once they are connected via Station Mode you are ready for the next step.
Remotely logging into the MacMini
Using a free Gmail account you have access to Google Remote Desktop. While you are logged into your Gmail on your MacMini open a new tab on your Chrome Browser with https://remotedesktop.google.com/ Click “Set Up Remote Access to control this computer” so that the MacMini will become the host(remote) computer that you will be controlling via your home(client) computer or laptop. Then from your home computer log into the same Gmail and open a new tab with the same link from above. If successful you should see the MacMini on your screen. Click it and enter your pin. Click enter and you should then see the desktop of the MacMini. Log into the MacMini with your password and you are in! (This will also work via a tablet, iPad, or an iPhone).
Things to do before sending the MacMini and Seestar to the remote site
Set up your MacMini with your Apple ID. Next set up the MacMini to be the host computer with Google Remote Desktop. That way as soon as the Mac is connected to power and the local wifi at the remote site/obervatory, you will be able to instantly connect from your client/home computer. I would also recommend you download the Seestar app to the MacMini beforehand. The support tech at Star Front Observatories plugged the MacMini and connected it to their wifi network. He also plugged in the Seestar and installed it on a telescope pier. See picture below.

I am super excited to finally have this all setup and ready to image from a Bortle 1 night sky.
The team over at Star Front Observatories in Texas are hard-core astrophotographers and astronomers who live and breathe this hobby. So far my experience with Star Front has been outstanding. The tech support is first-class. I reserved a pier one month ago and had my Seestar and leveler shipped directly to them. The MacMini followed a couple of weeks later.
March 24, 2025: Update post about the new Seestar Bar at Star Front
What makes Star Front so unique is the very reasonable monthly rates for access to super dark clear night skies. A mini pier for my Seestar is only $149.00 per month. You can host a more sophisticated rig like a Red Cat 51mm or 61mm refractor for the same rate! What?! The cheapest I found anywhere else was over $600.00 a month!!
Oh, and their Discord Server is very active. You can join the Discord even if you are not a customer. This has been a great resource of knowledge and information for me.
They mainly host much more expensive and sophisticated Astrophotography rigs than my little ole Seestar. Star Front is a new player in the remote observatory industry and is experiencing explosive growth. When I started at Star Front Remote Observatories they only had two buildings. As of January 2025 they have added 6 more! Watch their videos and you will see their passion and dedication.
Update: Jan 18, 2025 I added a pier cam! Its a ZWO ASI662Mc. Great for capturing time lapse video.

Keep looking up,
Carlos Garcia
StarPicturesMiami.com
Resource links